A polished answer can still fail the job. When I evaluate a copilot in Copilot Studio, I care about one thing first: did it complete the task correctly?
Here’s the short version:
- I define each task with a clear pass/fail rule
- I build test sets from sessions, files, or AI-made prompts
- I check pass rates and review case-level failures
- I inspect conversation traces and tool calls
- I confirm the final end state in the downstream system
- I tag each failure by cause, fix it, and rerun the same test set
- I block release if governance checks like CUI/PII detection or disclaimers fail
That matters because a copilot can sound right and still:
- pull the wrong document
- route work to the wrong place
- skip a workflow step
- write bad data into a system
In high-risk use cases, even a 90% pass rate may be too low if the failed 10% involves system writes, approvals, or restricted data. So I don’t stop at output quality. I check task completion, tool accuracy, audit trails, and whether the right business result happened.
A simple way to think about it: answer quality is only one signal; task success is the release gate. The rest of the article shows how I turn that into a repeatable test process inside Copilot Studio.
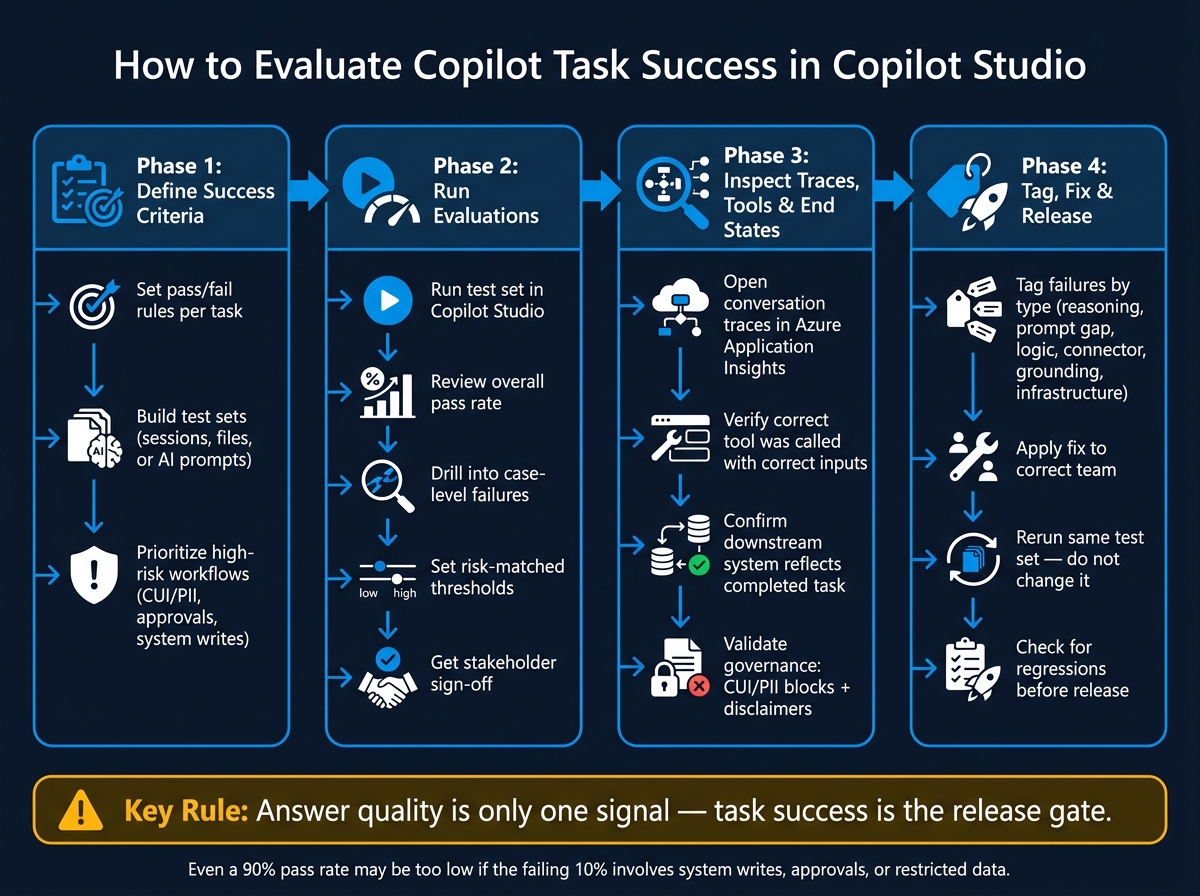
Copilot Task Success Evaluation: Step-by-Step Process
How to Test Your Copilot Studio Agent with 100 Questions – Full Evaluation Tutorial!
Define success criteria and build test cases
Before you run an evaluation in Copilot Studio, get specific about what “done correctly” means for each task. The key is to define it in a way the system can check. A good place to start is simple: turn each business task into a clear pass/fail rule.
Turn business tasks into pass or fail conditions
| Business Task | Pass Condition | Failure Condition |
|---|---|---|
| Policy Lookup | Answer cited from approved SOP; matches specific technical specs | Generic answer; no source citation; hallucinated values |
| Ticket Creation | Correct severity classification; all required fields (parts, tools) populated | Incorrect routing; missing safety lockout requirements |
| Approval Flow | Routed based on ITAR/CUI status; stays within dollar authority | Data leak to unauthorized user; exceeded approval limit |
| Maintenance | Work order created in CMMS; parts availability verified | Prediction made but no action triggered; downtime not scheduled |
Once those rules are in place, build test cases around them. If the pass condition is vague, your test results will be vague too. If the failure condition is sharp, weak spots show up fast.
Create test sets from sessions, files, or AI generation
You can build test sets from manual sessions, uploaded files, or AI-generated prompts. Use production data whenever you can, including messy inputs like inconsistent formatting, missing values, and half-complete fields. That’s where things usually break.
Each test case should spell out:
- the user intent
- the required tool or API calls
- the expected end state
- the explicit failure conditions
That level of detail matters. Without it, a test may look like it passed even though the copilot skipped a tool call, filled the wrong field, or routed the task to the wrong place.
Choose test cases that reflect production risk
Put the most attention on workflows where a bad action creates the biggest business or compliance risk. In practice, that usually means compliance lookups, spec reviews, maintenance scheduling, work order creation, and approval flows. These areas are more likely to expose gaps in tool-call accuracy and governance checks.
Edge cases need the same level of care. Test incomplete inputs. Test cases where a user’s role does not allow them to trigger an action. Test requests that fall just outside the copilot’s stated scope. A copilot that works fine with neat, complete inputs but falls apart on partial data or off-scope requests is not ready for production.
For aerospace and AEC workflows, make ITAR, CMMC, and CUI compliance detection required test cases. Use those risk-heavy scenarios to check tool calls, end states, and failure modes.[1][2]
Run evaluations and review pass rates before release
Run a test set and read case-level results
Run the test set in Copilot Studio, then look at the case-level results. The overall pass rate tells you if the agent is close to release. The case-level view tells you where things break.
That split matters. A decent pass rate can hide a pattern of failures in one task, one tool, or one edge case. Case-level results make those trouble spots easier to see.
After each change, run the same test set again. That gives you a clean before-and-after view, which makes regressions easier to spot early. Then use the failing cases to inspect traces and tool calls next.
Set thresholds and rubrics that match business risk
Not every task needs the same quality bar. Some actions carry more risk than others.
Use stricter thresholds for tasks that:
- trigger automated workflows
- write to systems
- route documents
For generative answers, score results with a rubric. That helps you tell the difference between acceptable variation and a failure that should block release.
In plain terms, a slightly uneven summary may be fine. A bad system write or a wrong document route is not.
Review outputs with stakeholders before production
Don’t approve a release based on pass rate alone. Export the results and review failed cases and near-threshold cases with the people who own the risk: operations, IT, compliance, and subject-matter experts.
If you can’t reproduce a result or audit how it happened, treat it as a release blocker. Those failed cases should then move into trace, tool-use, and end-state review.
Inspect conversation traces, tool use, and end states
Use conversation traces to find where tasks break
Start with the failed cases and the ones that barely passed in the last review. A conversation trace shows you where things went wrong. Open the trace in Azure Application Insights so you can inspect the turn-by-turn audit trail and any error signals [1]. Then walk through the conversation one turn at a time until you spot the exact step where the task drifted off course.
Check that the right tools were called and returned correct data
After you find the failure point, look at the tool calls around that moment. Make sure the intended tool was called and that it returned the data you expected.
For each case, verify:
- Tool invocation: the right tool was called with the right inputs.
- Tool output: the expected data came back.
- Governance: CUI/PII blocks and required disclaimers fired when needed.
- Routing: the task went to the right model.
One thing trips teams up all the time: a tool can return the correct output, and the case can still fail if the downstream system never changed. If that happened, log the failure type here so you can tag it in the next step.
Confirm the final business end state
A correct reply doesn’t mean the task was completed. For each case, check the downstream system and confirm the intended outcome is there - whether that’s an updated record, a triggered workflow, a completed form, or a routed document.
In regulated settings, end-state verification also means confirming that no CUI or PII was exposed during the tool call or in the response [1]. Keep this check separate from output quality. They can fail on different fronts, and the downstream outcome helps you tell the difference between a decent answer and an actually completed task.
Tag failures, fix the copilot, and prepare for release
Tag failures by type to speed up root-cause analysis
Once you’ve confirmed the end state is wrong, tag the failure before you change anything. That one step keeps the fix pointed at the right team instead of sending everyone on a wild goose chase.
After a failed end state is confirmed, label the issue by source:
- Wrong answer - reasoning error
- Missed intent - prompt gap
- Wrong tool selected - logic error
- Missing permissions - connector issue
- Excessive fallback - grounding problem
- Backend error - infrastructure
If you’re working in a regulated setting, add separate tags for CUI detection, PII warnings, and disclaimer failures.
Tags help route fixes to the right team. That makes ownership and triage a lot faster.
Rerun evaluations after each change to catch regressions
Use the tag to choose the fix, then rerun the same test set to check the change.
After each fix, rerun the same test set. Do not change the test set.
Look closely at the before-and-after results. If one failure type gets better but another one gets worse, you didn’t solve the issue. You just moved it. Treat regressions as blockers, not something to circle back to later.
Production release checklist and key takeaways
Before moving the copilot to production, go through this checklist. Each item ties straight back to a step in this guide.
| Checklist Item | Requirement |
|---|---|
| Success criteria defined | Each task has a measurable pass/fail condition |
| Test set built | Cases drawn from real sessions or production-risk scenarios |
| Pass rate reviewed | Thresholds set and met for each task category |
| Stakeholder sign-off | Output reviewed by business owners before release |
| Traces inspected | Failure points identified turn by turn |
| Tool calls verified | Correct tool, correct inputs, correct output confirmed |
| End states confirmed | Downstream system reflects the completed task |
| Failures tagged | All failures labeled by type and routed for fix |
| Regressions checked | Same test set rerun after every change |
| Governance validated | CUI/PII detection and professional liability disclaimers confirmed active [1] |
FAQs
How many test cases do I need before release?
There’s no fixed number of test cases you need before release. The goal is simpler than that: cover real team processes, messy data, and the edge cases you already know about.
Before moving to production, test with actual data, define failure modes and fallback behavior, confirm that the agent works across real team workflows, and verify that your measurable success criteria are met.
What should I do if pass rates are high but end states still fail?
Your evaluation framework may be missing the gap between what the model outputs and what the business actually gets from it.
That gap matters more than a lot of teams expect.
A high pass rate can look great on paper and still hide problems in production. Edge cases slip through. Weak source data can poison the result from the start. And bad assumptions about downstream interactions can quietly turn a “passed” output into a business mistake.
So don’t just score the model. Audit the full process.
Check the quality of the source data first. Look for deterministic failure points where the system can break in predictable ways. Add confidence gating so low-confidence outputs don’t move forward without review. Put human review in place for those cases. Be clear about authority boundaries too - what the model can decide, what it can suggest, and what still needs a person to approve.
Before release, add downstream reconciliation checks. That gives you a way to catch mismatches between the model’s output and what later systems, teams, or workflows expect.
Which failures should block production immediately?
Use hard-stop detection to block any failure that could expose classified information, including Controlled Unclassified Information (CUI).
Also block outputs that show signs of hallucination in sensitive, high-risk fields where mistakes could create liability, safety, or medical risk. Apply the same block to any process that lacks auditable provenance or can’t meet strict regulatory data-handling rules.